Custom GTM Domain for Server-Side Tracking
Google Tag Manager for WHMCS supports custom domains for server-side Google Tag Manager configurations. This feature allows you to load GTM container scripts from your own domain instead of the default www.googletagmanager.com, providing several benefits for tracking accuracy and reliability.
- Custom domain (host only): version 4.3.0+
- First-party path for Google tag gateway: version 4.4.3+
- Container injection left to the CDN: version 4.4.4+
Benefits of Custom Domains
Using a custom domain for your GTM container provides:
- Improved Tracking Reliability: Bypass ad blockers and tracking prevention mechanisms that commonly block
googletagmanager.com - Same-Origin Cookies: Better cookie handling with same-origin benefits when GTM runs on your domain
- Enhanced Data Collection: Reduce data loss from browser privacy features and extensions
- Brand Consistency: Keep all tracking infrastructure under your domain
Prerequisites
Before configuring a custom domain in WHMCS GTM, you need:
- Server-Side GTM Setup: A server-side Google Tag Manager container already configured and running
- Custom Domain Infrastructure: Your own domain or subdomain pointing to your GTM server
- DNS Configuration: Properly configured DNS records (CNAME or A record) pointing to your GTM server
- SSL Certificate: Valid SSL certificate installed for your custom domain (HTTPS is required)
This feature is only for server-side GTM configurations. If you're using standard client-side GTM, you don't need to configure a custom domain. The module will automatically use Google's default domain.
Configuration
Setting Up Custom Domain
- Navigate to Addons → Google Tag Manager in your WHMCS admin panel
- In the Container step, open the First-party domain or path section and use the Domain, or domain with path field
- Enter your custom GTM domain (
gtm.example.com) or the path your Google tag gateway uses (example.com/securemetric) - Click Save
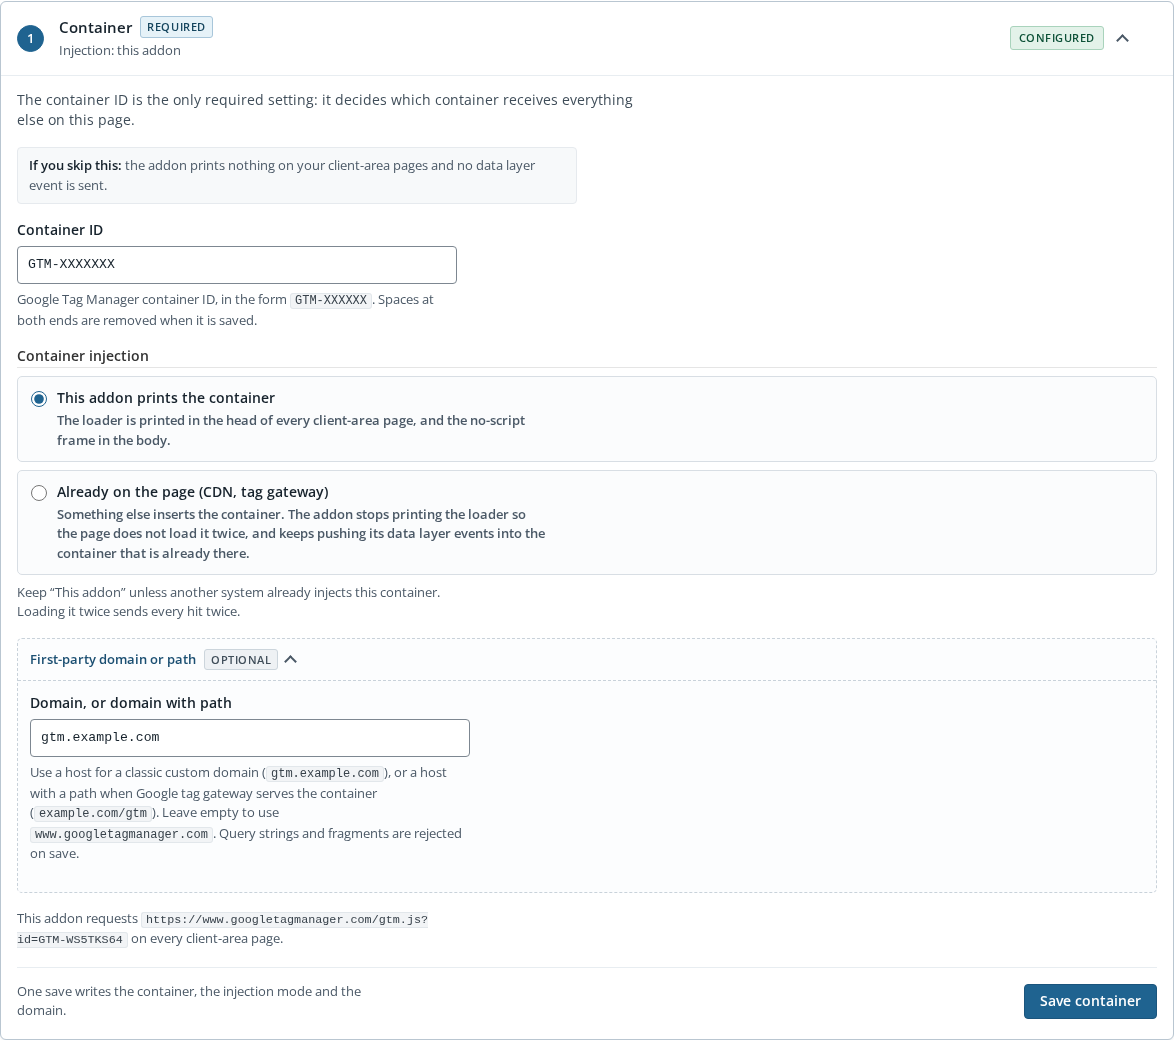
Domain Format Requirements
When entering your custom domain, follow these guidelines:
| ✅ Valid Format | ❌ Invalid Format | Reason |
|---|---|---|
gtm.example.com | https://gtm.example.com | Do not include protocol (http/https) |
example.com/securemetric | example.com/securemetric?id=GTM-XXXXX | Do not include query strings |
tracking.yourdomain.com | example.com/securemetric#tag | Do not include fragments |
| (empty field) | gtm@example.com | No special characters |
If you accidentally include http:// or https:// in your domain, the module will automatically strip it for you. However, it's best to enter only the domain name.
Domain Validation
The module automatically validates your custom domain input to prevent configuration errors:
- Protocol Removal: Automatically strips
http://andhttps://prefixes - Hostname Validation: Ensures valid hostname characters and structure
- Path Validation: A single path is accepted for a first-party path (
example.com/securemetric), limited to 100 characters and to letters, numbers, dots, underscores, dashes and slashes - Query and Fragment Rejection:
?and#are refused - Empty Value Allowed: Leaving the field empty falls back to default Google domain
If you enter an invalid format, you'll see an error message explaining the issue.
How It Works
URL Generation
When a custom domain is configured, the module generates GTM container URLs using your domain:
Default Behavior (No Custom Domain):
<!-- Google Tag Manager -->
<script src="https://www.googletagmanager.com/gtm.js?id=GTM-XXXXX"></script>

<!-- Noscript fallback -->
<iframe src="https://www.googletagmanager.com/ns.html?id=GTM-XXXXX"></iframe>
With Custom Domain Configured:
<!-- Google Tag Manager -->
<script src="https://gtm.example.com/gtm.js?id=GTM-XXXXX"></script>

<!-- Noscript fallback -->
<iframe src="https://gtm.example.com/ns.html?id=GTM-XXXXX"></iframe>
Backwards Compatibility
The custom domain feature is fully backwards compatible:
- Existing installations continue working without any changes
- If no custom domain is configured, the module uses
www.googletagmanager.com - All existing GTM containers work exactly as before
Google Tag Gateway and Edge Injection
Google tag gateway for advertisers serves the container and the measurement requests from the site's own domain. There are two ways to combine it with this addon, depending on who inserts the tag in the page.
Option A: the addon loads the container from the gateway path
Use this when the addon is responsible for inserting the loader.
- Enable the gateway in your CDN and note the measurement path, for example
example.com/securemetric - In the addon, set Custom Domain or First-party Path to the host plus the path:
example.com/securemetric - Leave Container Injection as This addon
- Save and check the page source: the container is requested from
https://example.com/securemetric/?id=GTM-XXXXX
The addon does not print the noscript fallback in this mode, because the gateway does not serve it.
Option B: the CDN injects the container
Use this when the CDN inserts or replaces the tag by itself, which is what Google tag gateway does on Cloudflare: it overrides the tag already present on the page. With the addon printing its own loader as well, the container loads twice and every hit is counted twice, which shows up as duplicated conversions and inflated sessions.
- In the addon, set Container Injection to Already on the page (CDN, tag gateway)
- Leave Custom Domain or First-party Path empty
- Save and check the page: the loader must come from the CDN, and the addon must not print one
In this mode the addon keeps sending its data layer events, such as invoice view, purchase and customer data, to the container already on the page, and pushes into the layer instead of replacing it.
The addon cannot verify that the container is really being injected somewhere else: the replacement happens at the edge, after the page leaves WHMCS. If you choose this mode and nothing injects the container, nothing is tracked. Switch the addon back to This addon before turning the CDN configuration off.
Which option to choose
| Scenario | Custom Domain or First-party Path | Container Injection |
|---|---|---|
| No gateway, default Google domain | empty | This addon |
| Classic custom domain, server-side GTM behind your subdomain | gtm.example.com | This addon |
| Gateway enabled, addon inserts the loader | example.com/securemetric | This addon |
| Gateway enabled, CDN inserts the tag | empty | Already on the page |
Server-Side GTM Setup
To use a custom domain, you need a server-side GTM infrastructure. Here's a high-level overview:
1. Create Server-Side Container
- In your Google Tag Manager account, create a new Server container (not Web)
- Note the container configuration and tagging server URL
- Configure your server container with necessary tags and triggers
2. Deploy GTM Server
Deploy your GTM server using one of these methods:
- Google Cloud Run: Recommended by Google, easiest setup
- App Engine: More control over infrastructure
- Self-hosted: Docker container on your own infrastructure
- Third-party providers: Managed GTM server hosting services
3. Configure DNS
Point your custom domain to your GTM server:
# Example DNS Configuration (CNAME)
gtm.example.com.  CNAME  your-gtm-server.run.app.

# Or with A record
gtm.example.com.  A  203.0.113.1
4. Setup SSL Certificate
Ensure your custom domain has a valid SSL certificate:
- Use Let's Encrypt for free certificates
- Or configure SSL through your hosting provider
- GTM requires HTTPS for security
5. Configure in WHMCS
Once your infrastructure is ready, enter the domain in WHMCS GTM configuration.
For detailed server-side GTM setup instructions, refer to:
Testing Your Configuration
After configuring a custom domain:
1. Verify Container Loading
- Visit any page on your WHMCS installation
- Open browser Developer Tools (F12)
- Go to Network tab
- Filter by your custom domain (e.g.,
gtm.example.com) - Verify that
gtm.jsis loading successfully from your domain
2. Check Source Code
View the page source (Ctrl+U or Cmd+U):
<!-- Should show your custom domain -->
<script src="https://gtm.example.com/gtm.js?id=GTM-XXXXX"></script>
3. Console Errors
Check the browser console for any errors:
- No 404 errors for GTM scripts
- No CORS errors
- No SSL certificate warnings
4. GTM Preview Mode
Use GTM's Preview mode to verify events are firing correctly through your custom domain.
Troubleshooting
GTM Container Not Loading
Problem: GTM script fails to load from custom domain
Solutions:
- Verify DNS is properly configured and propagated
- Check SSL certificate is valid and not expired
- Ensure GTM server is running and accessible
- Test domain directly in browser:
https://gtm.example.com/gtm.js?id=GTM-XXXXX
Mixed Content Warnings
Problem: Browser shows mixed content warnings
Solution:
- The module always uses HTTPS for GTM URLs
- Ensure your custom domain has a valid SSL certificate
- Check that your WHMCS installation is also running on HTTPS
Validation Error: "Invalid format"
Problem: Error when saving custom domain
Solution:
- Remove
http://orhttps://from the domain - Remove any path components (everything after the domain)
- Ensure no special characters or spaces
- Example correct format:
gtm.example.com
Validation Error: "Invalid first-party path"
Problem: Error when saving a host with a path
Solution:
- Use a single path segment set, for example
example.com/securemetric - Paths are limited to 100 characters and to letters, numbers, dots, underscores, dashes and slashes
- Query strings (
?) and fragments (#) are not accepted: the addon builds?id=GTM-XXXXXitself
Hits counted twice
Problem: Conversions and sessions are duplicated, and the container appears to load more than once
Cause: The container is inserted twice, once by the addon and once by a CDN or tag gateway that replaces the tag on the page
Solution:
- If the CDN inserts the container, set Container Injection to Already on the page (CDN, tag gateway) and leave the Custom Domain field empty
- If the addon should insert it, set Container Injection back to This addon and turn the CDN injection off
Fallback to Default Domain
Problem: Want to revert to Google's default domain
Solution:
- Simply clear the Custom Domain field
- Leave it empty and save
- Module automatically falls back to
www.googletagmanager.com
Security Considerations
HTTPS Requirement
The module always generates GTM URLs with HTTPS protocol, regardless of your configuration. This ensures:
- Secure communication between browser and GTM server
- No mixed content warnings on HTTPS sites
- Compliance with modern browser security requirements
Domain Validation
The module validates domain input to prevent:
- Code injection: Only valid hostname characters allowed
- Path traversal: Paths are rejected
- Protocol confusion: Protocols automatically stripped
Best Practices
1. Use Dedicated Subdomain
Use a dedicated subdomain for GTM tracking:
✅ Good: gtm.example.com, tracking.example.com
❌ Avoid: example.com, www.example.com
2. Monitor Server Health
Regularly monitor your GTM server:
- Check uptime and availability
- Monitor response times
- Set up alerts for downtime
3. Test Before Production
Always test custom domain configuration:
- Test in staging environment first
- Verify all events fire correctly
- Check browser compatibility
4. Document Your Setup
Keep documentation of:
- DNS configuration
- SSL certificate expiration dates
- GTM server deployment method
- Container configuration
5. Have Fallback Plan
Be prepared to quickly revert:
- Know how to clear custom domain setting
- Have access to GTM server infrastructure
- Monitor tracking data for anomalies
Performance Considerations
Latency vs. Reliability Trade-off
Using a custom domain may introduce different performance characteristics:
- Google's CDN: Fast global distribution, but detectable by ad blockers
- Custom Domain: Better tracking reliability, but depends on your infrastructure
Consider:
- Your server location vs. user locations
- CDN or proxy in front of GTM server
- Network performance monitoring
Recommendation
For best performance with custom domains:
- Use a CDN or edge network in front of your GTM server
- Deploy GTM server close to your users geographically
- Monitor and optimize server response times
Migration Guide
From Default to Custom Domain
- Set up server-side GTM infrastructure
- Test custom domain setup externally
- Enter custom domain in WHMCS admin
- Verify tracking continues working
- Monitor for 24-48 hours
From Custom Domain to Default
- Clear the Custom Domain field in WHMCS
- Save configuration
- Verify tracking switches back to
googletagmanager.com - Optionally decommission GTM server infrastructure