Module Configuration
This documentation will show you how to successfully configure Google Tag Manager for WHMCS module.
After install and activate the module, go to Addons -> Google Tag Manager. The panel opens on Setup, which walks through the configuration in three ordered steps. Step 1 (Container) is the only required one: with it saved the module already tracks page views. Steps 2 and 3 can wait and nothing breaks while they are empty.
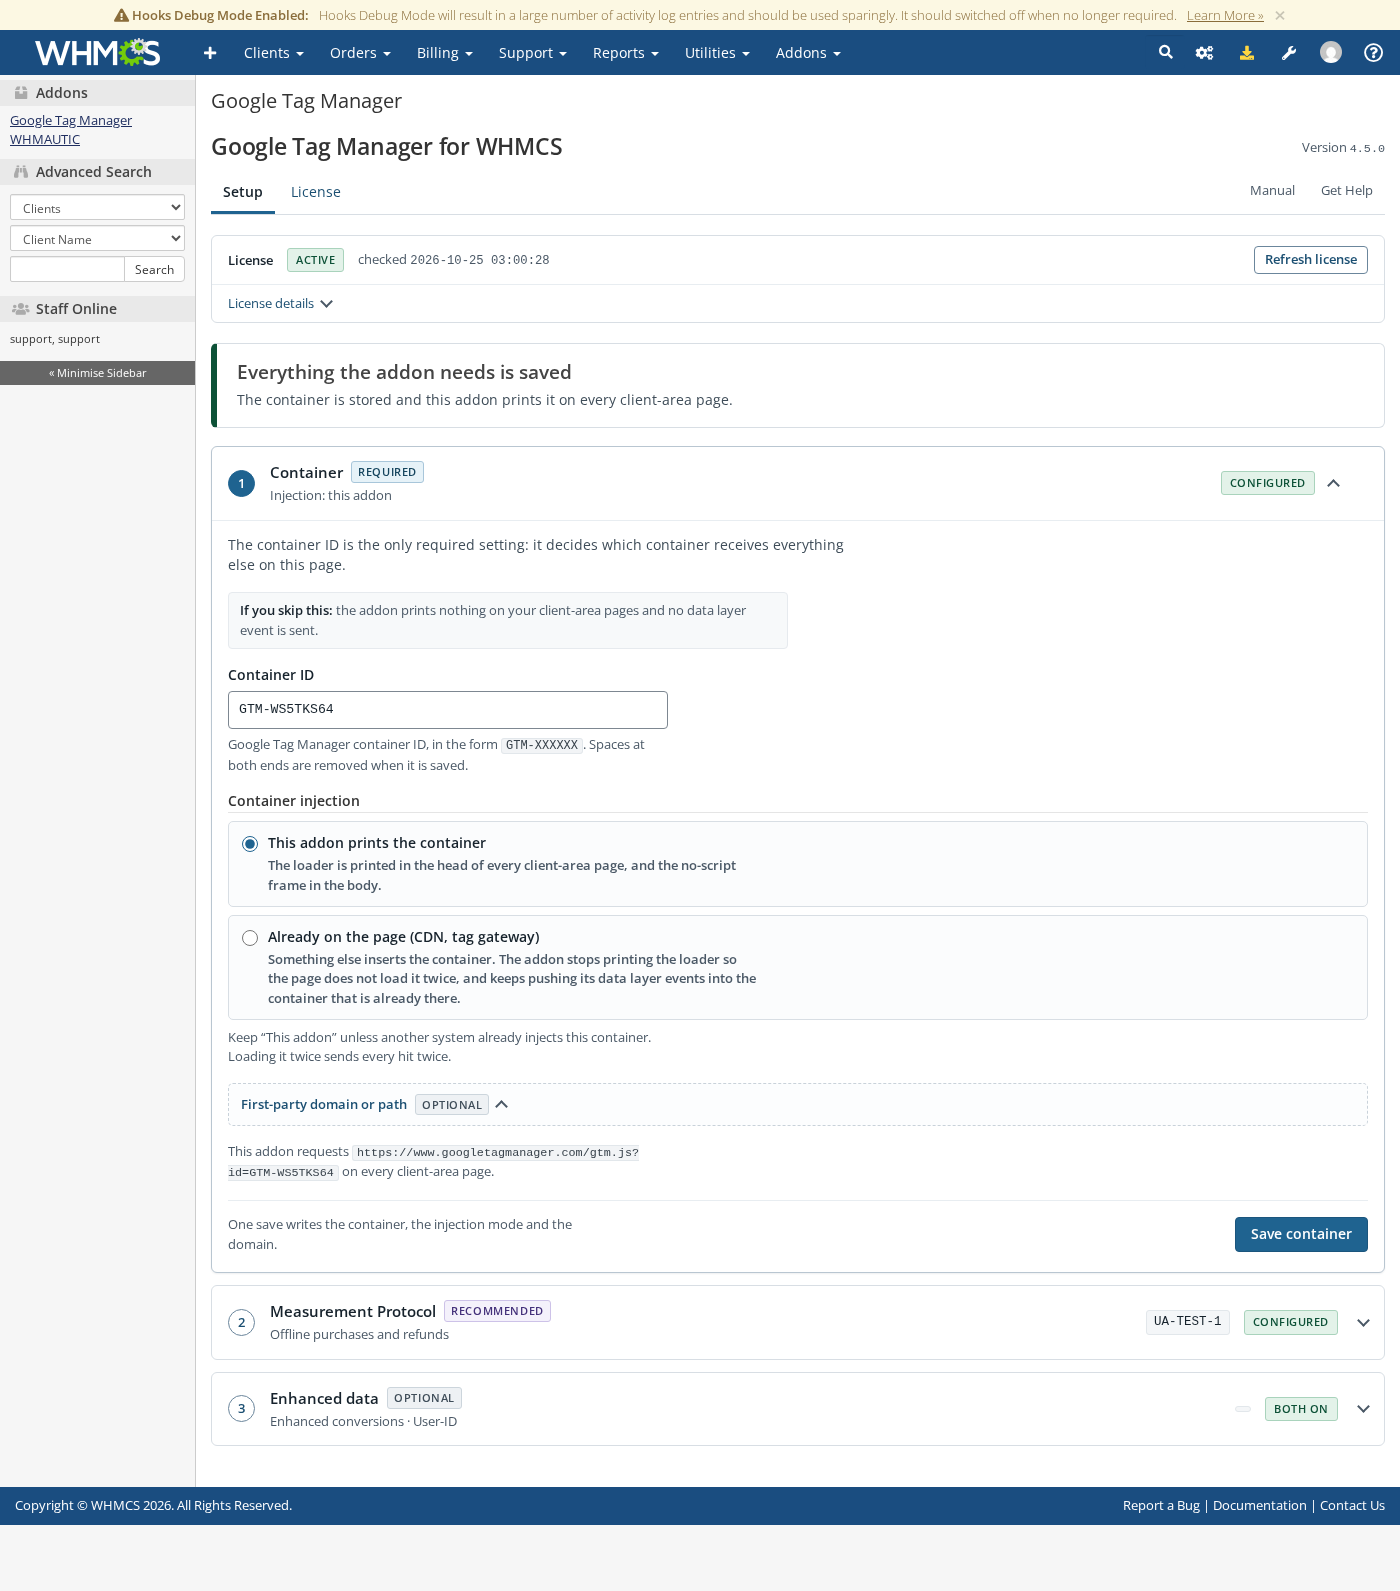
Each step shows whether it is already stored (Configured) or still empty (Not set). One step is expanded at a time: click a step header to open it, and save it with its own button. Saving redirects back to the same step with a confirmation, so what you see after a save is what is stored.
The status band at the top tells you where the installation stands. When every required setting is stored it reads Everything the addon needs is saved and names the injection mode in use.
Google Tag Manager
The container ID is what connects your WHMCS to Google Tag Manager. You can retrieve it from your Google Tag Manager account. If you do not have a GTM account or a container ID you need to create it first. Please refer to this link to see how to create your container.
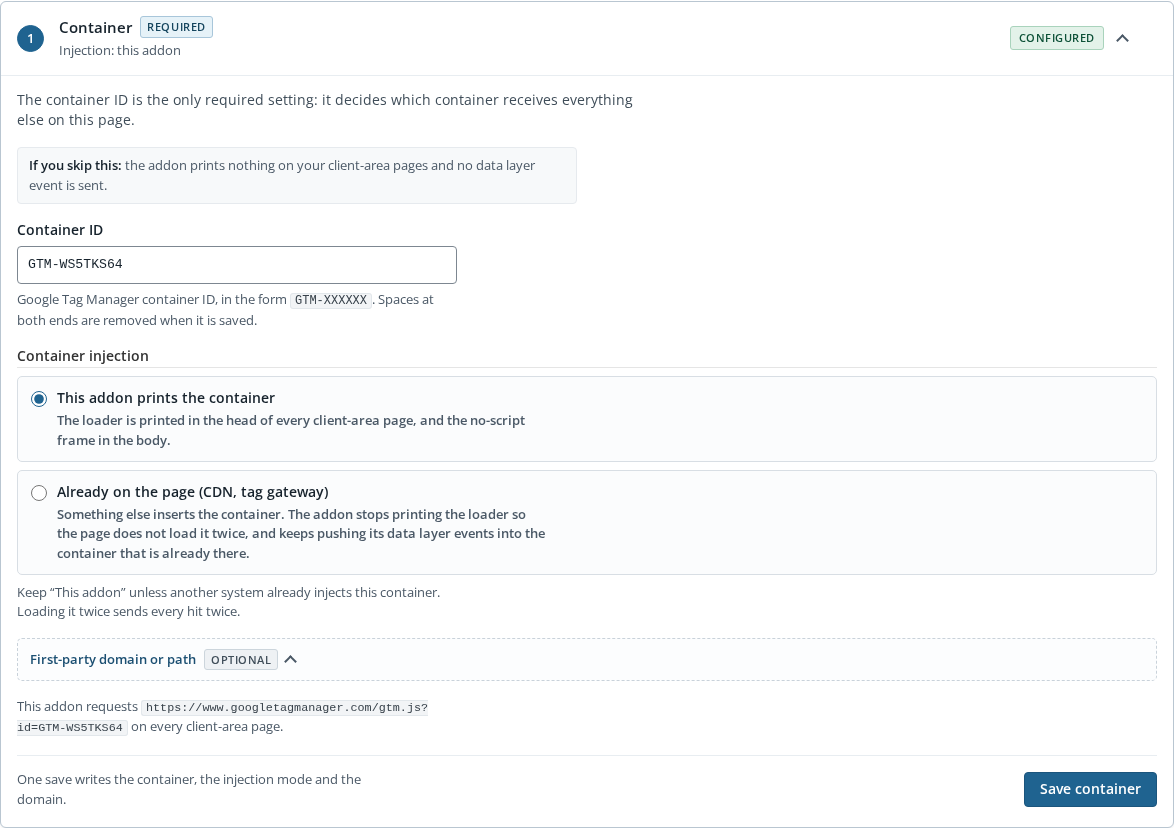
Container ID
Insert your container ID (ex.: GTM-XXXXX) and press Save container. Leading and trailing spaces are trimmed on save.
The field is required: saving it empty is refused with "Container ID is required. The stored container was not changed." and the container already stored stays in place. To remove the container from your pages, turn the injection off in step 3 of the module settings or uninstall the addon.
After configure your container ID, the Google Tag Manager snippet code will be inserted automatically in all your WHMCS pages. from now it is possible use all resources of your GTM in WHMCS.
First-party domain or path (Optional)
If you're using server-side Google Tag Manager with a custom domain configuration, open First-party domain or path inside the Container step and fill it in.
This advanced feature allows you to load GTM container scripts from your own domain instead of www.googletagmanager.com, which provides:
- Improved tracking reliability by bypassing ad blockers
- Better cookie handling with same-origin benefits
- Enhanced data collection accuracy
Example configurations:
gtm.example.comtracking.yourdomain.comanalytics.example.comexample.com/securemetric(the path a Google tag gateway uses to serve the container)
This feature is only applicable if you have a server-side Google Tag Manager setup with proper DNS configuration and SSL certificates.
If you're using standard client-side GTM, leave this field empty - the module will automatically use Google's default domain.
Container Injection
The Container injection setting tells the module who inserts the container in the page.
- This addon (default): the module prints the Google Tag Manager loader and the noscript fallback on every page. Choose this unless something else already injects the container.
- Already on the page (CDN, tag gateway): the module prints neither the loader nor the noscript, and keeps sending its data layer events to the container already on the page. Use this with Google tag gateway on Cloudflare, which replaces the tag on the page: with both inserting it, the container loads twice and every hit is counted twice.
The module cannot verify that the container really is injected elsewhere, because the replacement happens at the edge, after the page leaves WHMCS. While this mode is selected the panel shows a warning saying so, and the first-party domain field is not used: the module stops requesting the container URL. If you turn the CDN injection off, switch this setting back to This addon first, otherwise nothing is tracked.
For detailed instructions on configuring custom domains for server-side GTM, including setup requirements, validation rules, and troubleshooting, see the Custom GTM Domain documentation.
Google Analytics
Google Tag Manager for WHMCS module need to know some information about your Google Analytics to enable some offline events capabilities. This is step 2, Measurement Protocol, on the Setup screen.
Setting the Measurement ID will permit the module to send offline e-commerce events directly from WHMCS back-end making possible track virtually any order made without bind this to the obligation to fire the javascript code from the client-side.
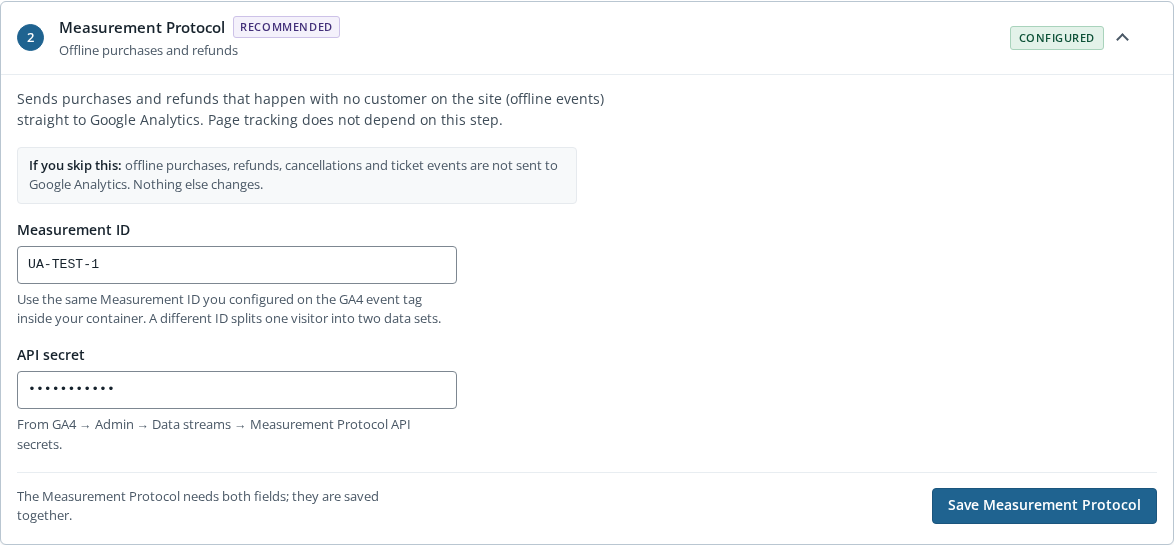
Measurement ID
A measurement ID in Google Analytics is a unique identifier for a web data stream (which is a website registered within Google Analytics). The format of a measurement ID in Google Analytics 4 is 'G-' followed by a combination of numbers and letters, such as 'G-PSW1MY7HB4.'
The measurement ID acts as a critical link, connecting your website to the corresponding data stream in Google Analytics 4. It ensures that the data from your site is sent to the right location.
On September 2023, Google rebranded the global site tag (gtag.js) to Google Tag. Existing GA4 properties can have the new Google Tag as the same Measurement ID, but in some cases they can be different. Ensure that you are using the Measurement ID provided on your selected data stream.
In the Google Tag perspective, the Measurement ID is the same as the Destination ID.
To find the measurement ID, follow these steps:
- In Admin, under Data collection and modification, click Data streams.
- Click the stream for which you want to find the measurement ID.
- The measurement ID is displayed at the top of the page.
If you have difficulty finding the Measurement ID, see the official Google Analytics 4 documentation [GA4] Set up Analytics for a website and/or app.
Please use the same Measurement ID as on your container tags. Using the same Measurement ID ensures consistence on the tracking funnel and conversions.
API secret
The Google Analytics 4 The Measurement Protocol is a set of rules for collecting and sending events directly to Google Analytics servers. Google Tag Manager for WHMCS module lets you send data to Analytics from your WHMCS without user interaction from the front end throw the Measurement Protocol.
A Measurement Protocol API secret is needed to enable this feature.

To create a new secret, navigate to:
- Admin
- Data Streams
- Choose your stream
- Measurement Protocol API secrets
- Create

If you already have an API secret, create a new one only for WHMCS. For better identification define a nickname like "WHMCS".
Paste your new API Secret in the API secret field of the Measurement Protocol step and press Save Measurement Protocol.
Both fields are needed: the step only counts as configured when the Measurement ID and the API secret are stored together.
From now, you have set up all configuration needed to ensure that WHMCS has your tracking info in all pages. The next step is to configure your container with some important information that will bind all the data needed in Enhanced eCommerce from your WHMCS.
Enhanced data
Step 3, Enhanced data, is optional. It turns on the extra data layer fields used by Enhanced Conversions for Web and User-ID.
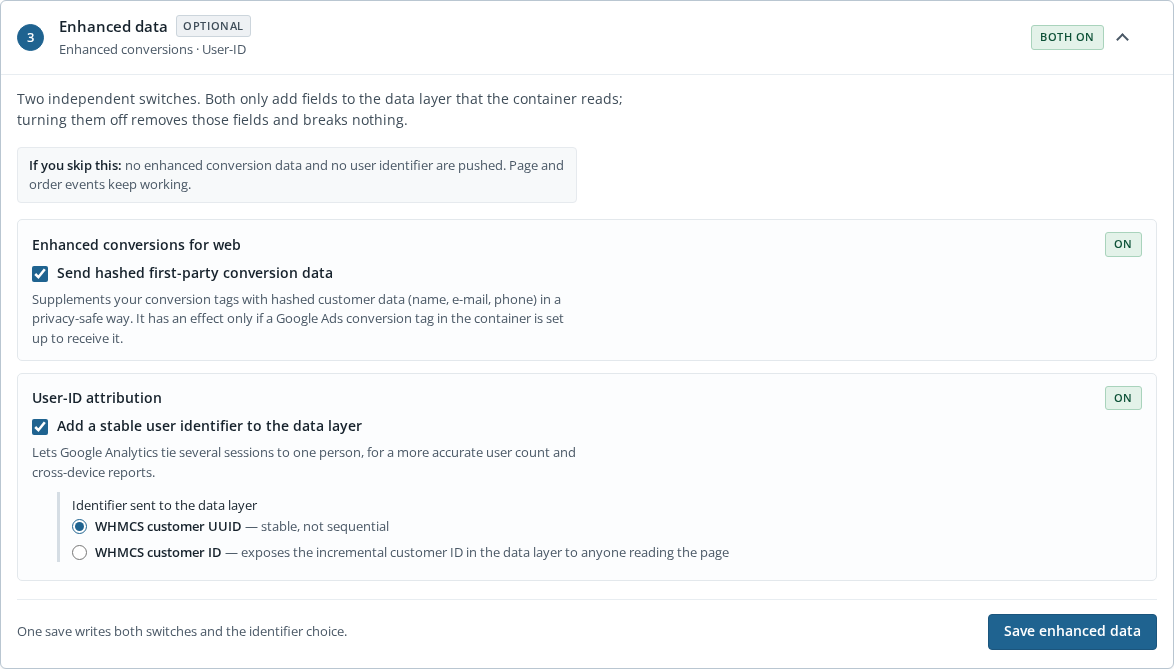
Enhanced Conversions for Web
Enhanced conversions for web is a feature that can improve the accuracy of your conversion measurement. It supplements your existing conversion tags by sending hashed first-party conversion data from your website to Google in a privacy safe way. The feature uses a secure one-way hashing algorithm called SHA256 on your first party customer data, such as email addresses, before sending to Google.
Enhanced conversions for web improves measurement of online conversions, allowing you to send hashed first-party, user-provided data from your WHMCS when a user converts. The data is then used to match your customers to Google accounts, which were signed-in to when they engaged with one of your ads.
How it Works
When a customer completes a purchase on your WHMCS, you will receive first-party customer data such as an email address, name, address, and/or phone number. This data will be exposed in your data layer, hashed, sent to Google in its hashed form, and then used to enhance your conversion measurement.
- Google signed-in user views your Google ad.
- The user converts on WHMCS.
- WHMCS GTM data layer captures first-party customer data, hashes and sends it to Google.
- The hashed data is matched against Google hashed user data and a conversion is reported in your account.
Enable Enhanced Conversions
To enable Enhanced Conversions for Web, check Send hashed first-party conversion data in the Enhanced data step and press Save enhanced data.
To learn more about Enhanced Conversions for Web visit About enhanced conversions and Enhanced conversions for web impact results documentation.
User-ID Attribution
User-ID Attribution is a feature that lets you associate a persistent ID for a single user with that user's engagement data from one or more sessions initiated from different devices. By doing so, you can get a more accurate user count, analyze the signed-in user experience, and get insights into your users' behavior across devices.
To enable User-ID collection for GA 4, check Add a stable user identifier to the data layer to set a user id attribute in your data layer.
Define Custom User-ID
To better fit on your user identification strategy, you can choose to between Customer UUID or Customer ID to be used as User-ID Attribution value.
- Customer UUID: Use the WHMCS customer UUID as value, ex.:
c0a8a7b1-1b1b-4b1b-8b1b-1b1b1b1b1b1b. - Customer ID: Use the WHMCS customer ID as value, ex.:
1234.
Select the option that best fits your strategy and save the settings.
We do not recommend using the Customer ID as a custom User-ID value as this option will expose the incremental customer ID to datalayer in WHMCS pages when user logged in.
To learn more about User-ID attribution visit Measure activity across platforms with User-ID and The Google Analytics user ID documentation.
License
The License tab shows the license state, when it was last checked and the details the license server sends back: validity, masked key, valid IP and domains, the licensed account and the module version.
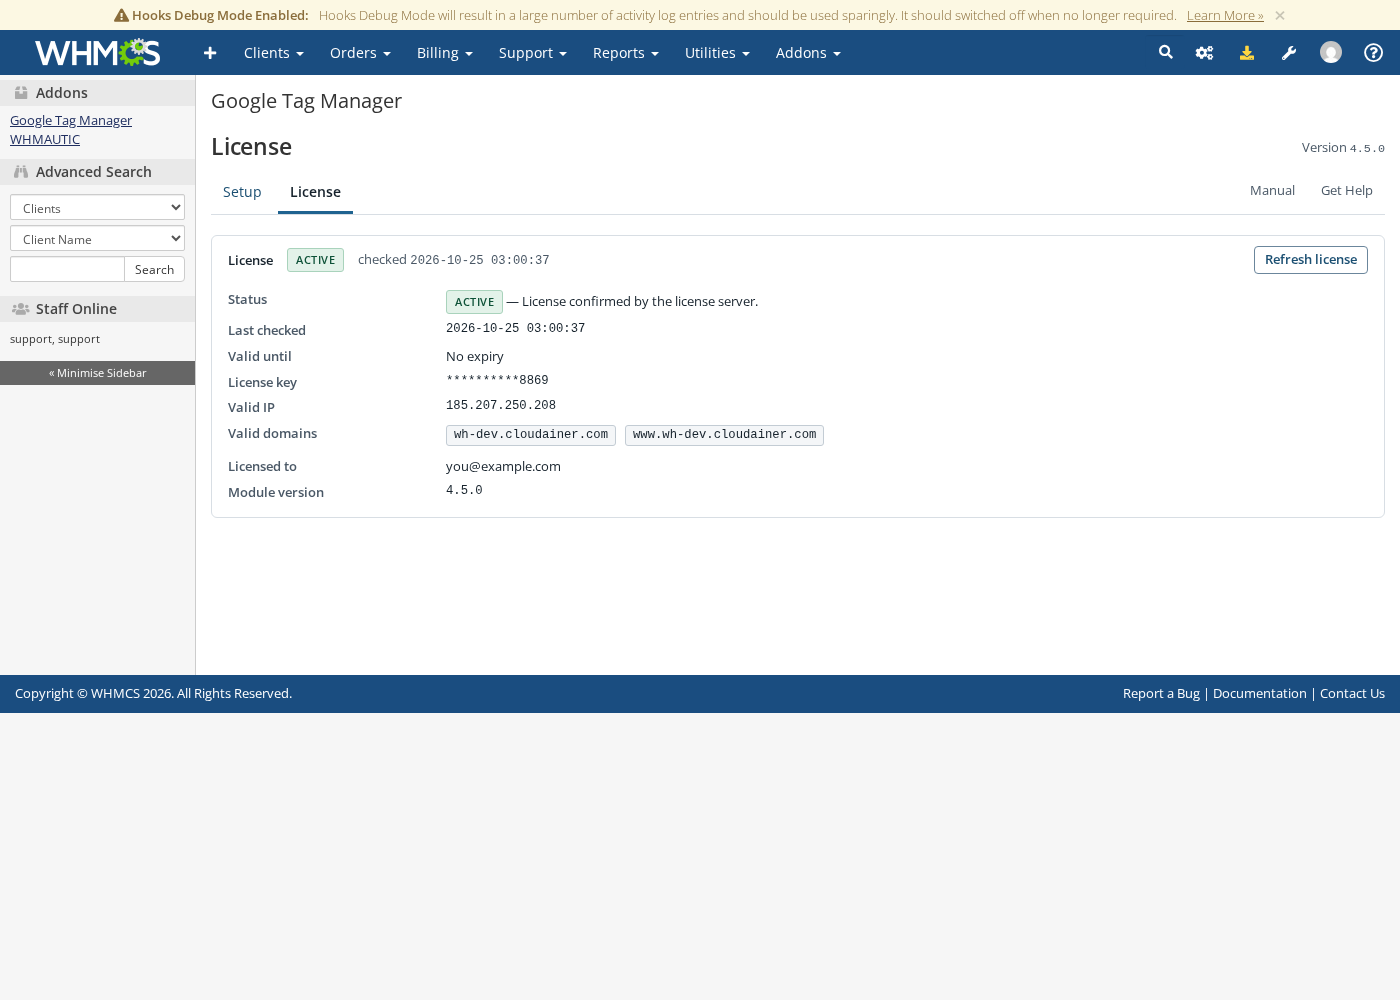
- Refresh license asks the license server again instead of waiting for the next automatic check.
- License details holds the full answer from the server; the key is always shown masked.
- Valid until shows No expiry when the license does not carry an expiry date.
If the license is not valid, the module sends you to the WHMCS license error page instead of showing the Setup screen, so a blocked installation is never confused with a misconfigured one.